Our prolific contributor offers a new insight for accurately devising a counterbore assembly for machining:
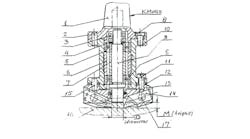
“Sometimes we need to machine bosses or lugs (16) on a casting or forging, and to maintain accuracy for machine dimensions D and M — especially M.
“In these cases we use a counterbore assembly, as shown is this sketch.
“The drive takes its rotation from the spindle of a drilling or milling machine by (1) Morse taper-cone.
“On the taper (1) the bush (10) is fixed by four screws (8) and two pins (2). On the bush (10) the safety stop axle (9) is fixed with two angular or annular balls (5), bushes (6 and 7), two nuts (3) and a ring (4).
“When the axle (9) touches the top of the surface (16), the axle (9) turns but stops moving down due to the upward feed of the counterbore, maintaining the dimension (M). After this, the machine stops its operation.
“On the bush (10) a housing (13) is fixed by four screws (11) and two pins (15).
“In the housing (13) are built three or four cutters (14) with insert carbide plates. Cutters are fixed in the housing (13) by screws (17).
“The dimension (M) can be adjusted by the grinding with the ring (12).
“The counterbore is simple to produce and to use. The ball bearing will need grease and field packing.
“The Morse taper must have corresponding heat treatment, all details must be produced from quality steel, and the machine dimension (D and M) must be set up according to a template.”


