By Hannes Daniel and Jrgen Dussling
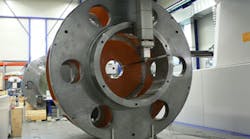
Measuring a gear with the VAST gold probe. The active scanning standard probe, VAST gold, can handle very large probe systems and extensions.
In the market for wind power systems, quality assurance according to international industrial standards has become an important issue. Wind power plants are no longer a niche for environmental proponents, but a serious business where cost efficiency, lifecycle costs, reliability and availability of the components must be considered. Coordinate measuring machines play a vital role in ensuring the accuracy and quality of components.
Carl Zeiss IMT has developed its series of MMZ machine measuring centers tailored for precise, economical measuring of large parts.
Gear boxes are a major part of all wind turbines, and their quality requirements are high: as the wind blows in gusts, a backlash-free operation is indispensable to ensure a long and beneficial system life. Mechanical efficiency is directly related to economic efficiency. Noise reduction in the gear box is important to ensure the public acceptance of wind turbines and the industry has to follow these requirements. Not many manufacturers are able to produce such large gear boxes (and with the off-shore systems, the sizes are even larger), and now they have to deal with serial production, having many unknown requirements for quality in very large dimensions.
Gears (ring-gear, sun gear, and planet), bearings, and housings have to be produced with tolerances down to 1/100 mm – on components with 4 m or more in diameter. It is no longer possible to machine these parts without specific measures to ensure the quality because the parts are too expensive to produce rejects. So, a reliable control of the manufacturing process has to be installed, in real time during machining.
Carl Zeiss has been manufacturing precise measuring instruments for 90 years. For a traditional customer of CMMs, such as the automotive industry, the standard machine size was around 1 m3. But, very early on, applications for printing machines, truck diesels, energy, and aircraft parts, etc., made it necessary to develop a series of larger machines.
Today, Carl Zeiss’s larger models are the MMZ series: The MMZ E and B gantry-type machines, dedicated for composite parts and machined parts with standard accuracies, the MMZ T bridge-type machine with an integrated steel table for the high-accuracy “mid-size” class (up to 2,000 mm x 3,000 mm x 1,600 mm), and finally the MMZ-G for large precision components. Sizes are available from X = 2,000 mm, Y = 3,000 mm, Z = 2,000 mm up to very large systems able to measure gears and bearings up to 5 m in diameter, and housings or other machined parts up to 11 m long, 5 m wide, and 3.5 m high.
The machine is designed as a welded steel construction; everything is calculated according to the finite elements method. It moves on linear guideways, driven by a ball screw spindle, and is rigid and robust as a machine tool. It has no air consumption. The machine can be equipped with floor-integrated rotary tables, holding up to 12,000 kg. Gears can be measured with or without the rotary table. For some helical or bevel gears, a rotary table would help to get full access to gear flanks.
With the standard CALYPSO® software, all geometric dimensions can be easily measured, including form and position tolerances. Adding the well-proven GEAR-PRO software allows for measuring of internal and external gears, straight or helical. Bevel gears and worms are measurable.
With the ZEISS VAST® probe head, the machine not only takes single points but is optimized for surface scanning. Navigator® technology allows scanning using long, flexible styli at high-speed rates without losing accuracy. The probe head can hold probes up to 600 g of weight and 800 mm of length in all directions. This makes it possible to reach deep features in housings, making difficult structures accessible.
The typical accuracy varies from 2.8∝ m+L/400 for the 2 m by 2 m to 8.4∝ m+L/180 for the 5 m by 3.5 m bridge.
The MMZ G is not a dedicated gear checker: It can measure gears as well as housings, bearings and all kinds of different precision parts on the same machine, with best-in-class accuracy.
Hannes Daniel is the product manager for Inline Metrology, and Jrgen Dussling is the product manager for MMZ CMMs, both with Carl Zeiss Industrielle Messtechnik GmbH, a provider of CNC coordinate measuring machines and complete, multi-dimensional metrology solutions.


