Wenzel GmbH, Wilcox Associates Inc. and Micron-X- Corp. are bringing coordinate measuring machine capabilities to the sides of machine tools with machines and gauges that are engineered to withstand the rougher environment of the shop floor.
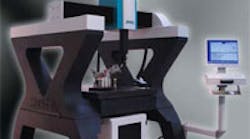
Wenzel said its X-Checker Series of CMMs combines the benefits of stable granite components with frictionless bearings, pneumatic counterbalance, gage performance, repeatability and reproducibility to provide performance on-the-floor.
The X-Checker has a maximum 3D measuring speed of 700 mm/sec (27.56 in./sec) with maximum acceleration of 2,000 mm/sec2 (78.74 in./sec2) The CMM has a measuring range (X, Y, Z) of 750 mm by 1,000 mm by 500 mm (29.53 in by 39.370 in. by 19.69 in.).
The company said the CMM has a high degree of thermal stability with dynamic performance features, and a special X-shaped machine base design cast from a polymer mineral resin that provides a rugged and stable platform. Its guideways are covered with machine tool bellows that protect the ballscrews from dirt and contamination as well as exposed sunlight and short-term temperature variations.
Its CNC controller, Renishaw electronics and programmable control are mounted inside a lockable controller cabinet that is located under the machine base to minimize the CMM footprint and to ensure tamperproof operation.
These CMMs, available at prices starting at $50,000, are sold in the United States by Xspect Solutions, Inc. (www.xspectsolutions.com), which is a wholly owned subsidiary of Wenzel Gmbh of Germany. Xspect Solutions is headquartered in Wixom, Mich.
Wilcox Associates (www.pcdmisems.com) said it has adapted its PC-DMIS CMM software as an interactive metrology package that can report directly to a numeric controller on a machine tool to provide true through-the-spindle metrology.
The company’s PC-DMIS NCi software provides real-time feedback to machine tools based on measurements taken as parts are produced.
It establishes a bi-directional link between the metrology software and the machine tool’s controller to allow users to take advantage of the software’s tools for interactive alignments and relative measurements.
In addition, Wilcox Associates said the software provides for updating work offsets (X, Y, Z and rotational) and probe offsets based upon the evaluation of measurement data and allows for the writing and reading of data to and from the controller.
The new PC-DMIS NCi is available for a wide range of machine tools equipped with either Siemens or Fanuc controllers and includes support for most articulated wrists and rotary tables. Interfaces to additional controllers and devices are under development.
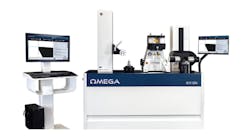
Micron-X- Corp. (www.micron-x-corp.com) said its new, multifunction precision CMM gauge that it calls the Cobra combines the features of an “in process” 3-axis CMM, a diametric measuring machine (DMM) and a height gauge.
Micron-X said its new gauge is small, fast, accurate, and factory hardened and gives machinists CMM capabilities to ensure that their machining processes are correct and accurate, so that they can eliminate mistakes at the root of the problem.
The Cobra gauge is built on a granite base, and it has a main structure that floats on an air bearing that the company said is not influenced by temperature variations to allow the gauge to remain true and accurate.
The gauge also has floating scales that the company said are not subject to the influence of the base material on which it rests.
Separately, Wenzel has developed probe change racks for CMM machines as a standard feature with any of its new CMMs that are configured with a Renishaw PH10 motorized probe head and a Renishaw touch or scanning probe.
The automated change racks are being provided because range of features and components that are measured on a CMM in typical manufacturing operations require multiple probes, Keith Mills, president of Xspect Solutions, said.


