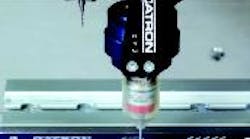
A probe integrated with its machine tool retracts when not in use.
A Datron machine with a Renishaw TP 20 probe can be used to ensure constant depth of cut on round parts.
In an ideal world, an optical or another non-contact inspection technique would be the best way to measure complex, micromachined parts, but this is often impractical. Optical systems have the advantages of speed, and they avoid part distortion, but they have limitations because the visible edge of a workpiece often does not reflect what lies below it. Also, optical systems often cannot determine three-dimensional defects such as parallelism, perpendicularity, cylindricality or flatness.
However, by combining the strengths of several sensor technologies in a single measurement system, all of the critical features of a complex part can be measured in one setup. Such multisensor measurement systems often include non-contact sensors — video, white light, and/or laser — for surface and edge measurements, and touch-trigger and scanning probes to reach part features that are inaccessible to the non-contact devices, such as deep counterbores.
PROBING MICROFEATURES
Traditional measurement technologies, such as coordinate measuring machine touch-trigger probes, have evolved to adapt to changing requirements. Today there are transducers with different levels of triggering pressure, styli of different lengths, and probe tips of different sizes and materials. But as features get smaller, there are physical limits as to how small these probes can get and still trigger reliably. For example, a thin stylus can bend before the probe triggers, misrepresenting the location of the surface. Or, a long stylus can "shank" (strike the edge of a hole or slot) and register a data point when, in fact, the probe tip has not touched the wall of the area being measured. Advances in manufacturing technologies and use of EDM have resulted in the ability to produce micro features that are difficult to measure, such as minute orifices. In some applications, the size of a touch-trigger probe tip or the length of the stylus may prohibit touch-trigger measurement altogether. Applications where touch-triggering may be inappropriate include the measurement of small slots, holes, grooves, or bore draft angles because a conventional probe must deflect to register a position.
Two types of probes are commonly found in machining. The first is an accessory added to a pre-existing machine, otherwise known as a spindle-mount probe. The second is a probe built into the machine from the ground up, called an integrated probe. These probes can fold down so that they don't get in the way of the tooling, so they eliminate the need for a tool change. Machine-integrated probes are reliable, always available, and reduce drawbacks such as dealing with cables, coping with radio interference and securing power sources.
A conventional machine built with an integrated probe becomes a machine that senses and reacts to its environment. Machines that have these capabilities are particularly valuable as parts become increasingly smaller and as parts are required to be available in a larger number of varieties.
COMMUNICATING WITH CONTROLLERS
Advanced probing technologies are integrated with the controller and software running a machine tool. For example, Datron Dynamics, Milford, N.H. (www.datrondynamics.com), a manufacturer of high-speed CNC milling and engraving machines, has developed a third-generation, integrated probing system that, as its first action, checks to ensure that a part is positioned properly. It then scans and recognizes the part and selects the appropriate program for machining. Dr. Walter Schnecker, Datron president explains, "Even if an operator loads the wrong part, the machine still produces a good part because the right program for that part was determined by the probe scan. Smaller shops with a lot of changeover from part to part can realize reductions in changeover and cycle time because of the ability to automatically check workholding accuracy."
A Z-Correction Probe on Datron machines recognizes irregular workpiece topography, whether those irregularities occur accidentally or by design, and the probe helps the machine to compensate for it dynamically. It does this by taking measurements along the surface of a blank and feeding that data into the machine controller. The controller adjusts for uneven surfaces or workpiece position automatically. Through this process, job setup times are reduced and part rejection is minimized.
The Z-Correction Probe is mounted permanently next to the spindle and is pneumatically extended only when needed. Based on its integrated design, it requires no tool changes, there are no cables to get in the way and the device cannot be damaged by accidentally turning on the spindle.
When fitted with a 3D extension, the Z-Correction Probe locates parts and material irregularities in the X, Y, and Z coordinates, finds centers of holes and bosses, pre-measures blanks before machining, compensates for material variations, feeds data into an ISO 9000 information chain for quality control and allows for the reverse engineering of many parts.
Datron machines with a Renishaw TP20 probe can be used to measure complex parts and part features, such as engraving a logo onto a rounded surface. Ordinarily, 3D programming would be required to accommodate surface depth changes and to ensure an even engraving depth. With the TP20, the surface is scanned and irregularities or changes in the part surface are automatically managed in the machining data without 3D programming. The TP20 has a six-way, kinematic, touch-trigger probe system to improve cycle times.
A LIGHT TOUCH
The F25 machine from Carl Zeiss IMT Corp. (www.Zeiss.com) is a touch system, coupled with an optical system, that incorporates three sensors — two for measurement and one for operator assistance. One is a piezo-membrane-based full scanning touch sensor that can take touch points. It also can be used in a fully automatic scanning mode. Gerrit deGlee, new product manager for precision products at Zeiss, points out that the stylus diameter can be a small as 0.12 mm, and the touch pressure is almost 100 times less than typically experienced on coordinate measuring machines. "This is important because it permits lighter fixturing forces. Micro parts can be distorted by workholding devices and care must be taken to hold parts to provide gaging access without deforming the part," says deGlee.
The optical system on the F25 machine, mounted adjacent to the touch sensor, can be used independently or in combination with the touch sensor. The system has a ring-light source that is programmable in terms of intensity and direction to minimize unwanted shadows.
When trying to measure very small or microscopic features, it is difficult for operators to see what they are doing. For instance, the 0.12- mm stylus tip on the F25 is almost impossible to see without magnification. So, the machine has an optical system that magnifies the measurement area of the touch probe and displays the image on a monitor for the operator to use in program development. The optical inspection system displays the measurement directly to the measurement software screen.
The F25 is not a factory-floor machine because of its high accuracy and the lack of control of thermal influences typical of shop environments. The uncertainty of measurement for the machine is less than 250 nanometers (less than 0.00025 mm or 0.0000098 in.). Thermal influences on workpieces can be very significant when measuring to these accuracies. The machine has thermally stable glass-ceramic reference scales that were developed originally for telescope use. This material eliminates the uncertainty of the coefficient of expansion of the scale, as well the need for thermal sensors on the scales.
NO-TOUCH PROBING
One micro-touch probing technology that requires no stylus deflection is available on Smartscope multisensor measurement systems from Optical Gaging Products Inc. (www.ogpnet.com) in Rochester, NY. The technique, called Feather Probe, uses a miniature probe that is in constant micromotion. The probe has a tip as small as 0.125 mm at the end of a very narrow stylus. As the tip approaches the object to be measured, proximity to the surface causes a change in the micromotion that is registered as a measurement. The probe does not deflect, and the measurement uses less than a milligram of force. OGP says the Feather Probe eases measurement of small slots, holes, grooves or bore draft angles and can measure flexible or deformable materials. The technique works in the X, Y and Z axes.
To guard against damage, the probe retracts into a protective housing when not in use and deploys only when required for an automatic measurement.
Another metrology sensor from OGP capable of non-contact measurement of surfaces with both high lateral and height resolutions is the Rainbow Probe white-light sensor that can obtain submicron Z-axis resolution. This technique uses extended axial chromatic dispersion in a lens where each wavelength of light focuses at a different point on its optical axis. Chromatic analysis makes the Rainbow Probe insensitive to surface reflectivity and roughness variations. When used in a multisensor measurement system, the probe can scan a surface to provide non-contact measurement of high-frequency surface detail along a contour of almost any shape. Adjacent scans create topographic maps of an area.
MULTISENSOR SYSTEMS PUT IT ALL TOGETHER
Complex parts that compbine geometric, prismatic shapes with free-form contours, have critical clearance holes or locating points and have important relationships at numerous positions on the part, require measurement systems with multiple sensors. Multisensor measurement machines can use specific sensors for particular features as part of a total part characterization.
The software integration of sensors in a multisensor measuring system is an important consideration. The best software integration packages calibrate all the sensors that are being used so they can be used at any point in a measurement routine, while poor integration may require each sensor to be calibrated before each use. Also, effective integration permits data to be processed and analyzed from any sensor, and easily handles video edge points, laser point clouds and scanning touch-probe data in a single measurement routine.
"A key advantage of large capacity (large stage travel) multisensor systems with microprobes over a dedicated micromeasurement system is the ability to relate the microfeature measurements to the macrofeature dimensions and locations across the entire part in a single data file," points out Fred Mason, president of Optical Gaging Products. A system with the travel of a traditional videomeasuring system and the resolution of a microprobe can locate critical microfeatures on a part, or in relation to a single critical datum.
Microsensors can be used on multisensor metrology systems of nearly any capacity. An important video-measurement-system consideration is to ensure that the machine has the high-resolution positioning necessary for high-magnification imaging of specific part locations within the measurement volume. Microprobing is most accurate when the measurement system on which it is performed delivers a high level of precision. With video and microprobe measurements combined in a single measurement routine, complete part characterization can be produced with minimal user interaction.
