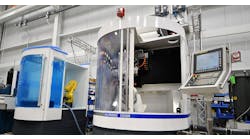
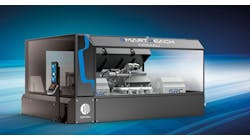
Vertical and horizontal machining centers face a variety of different demands. Selecting a bearing configured to meet the demands and installing it properly help to improve both productivity and performance. "Productivity" measures the efficiency with which process inputs are converted into useful outputs. When it comes to machining, the best way to achieve productivity in any metal removal operation is to reduce the cycle time and eliminate any unscheduled downtime and scrap. Get more products out the door at a lower unit cost, and you’ll boost your bottom line.
In Part 1 I discussed how selecting the right bearing configuration for a CNC machining center spindle can optimize performance. Improper installation or the use of the wrong bearing design and configuration can increase cycle time significantly, and may cause the entire machine to go down.
In this follow-up, I will explain eight critical factors that can be optimized to maximize machining productivity.
1: Duty cycle. Whether you’re a machine tool spindle designer at an OEM or a maintenance, repair and overhaul shop, the demands of the end-use application are critically important when making a bearing selection.
Bearing selection starts with establishing the duty cycle for the CNC machine during production. The duty cycle includes every milling, drilling, boring, tapping or any other operation in the machine cycle. Cycle time refers to the time it takes to perform those operations.
As I noted previously, a duty cycle can include a wide range of operations from roughing (high loads, low speeds) to finishing (high speeds, low loads) and everything in between. Even if a CNC machining center is equipped with spindle bearings that are optimized for a duty cycle at the time of purchase, there is no guarantee the bearings will be optimized for future duty cycles. Many are replacing transfer lines with flexible CNC machining centers due to smaller volumes and more frequent product changes. But with this shift comes frequently changing duty cycles.
2: Tool loads and speeds. It is important to estimate tool loads and speeds because different bearing designs and configurations will vary in the amount of heat and stress they generate under each condition—and that directly impacts the life and operating temperature of the spindle.
Once the duty cycle is established, tool loads and speeds for each operation must be determined. The cutting operation and material dictate the tool type, geometry, cut depth and width, and feed rate. Tool loads and speeds depend on whether the machine is roughing or finishing. The workpiece material (be it steel, aluminum, titanium, nickel or something else) and hardness also impact the tool loads and speed.
The most reliable and accurate method to determine tool loads and speeds is to interpret process data from actual cutting operations. If the actual motor power, spindle speed and tool diameter are provided, the cutting load can be derived by setting the cutting power (tool force x tool diameter x speed) equal to the actual motor power and solving for the tool force. However, this only holds true if the cutting operation and workpiece material/hardness are the same. Collecting this process data over time is a very valuable investment and can help eliminate the guesswork from determining tool loads and speeds.
An analytical approach can help verify the collected process data. Many tool suppliers can calculate tool loads and speeds and will assist with tool selection. An alternative analytical method to calculating the tool loads would be to refer to a machine tool text book. One of my favorites is Technology of Machine Tools, 7th Edition, by Steve Krar, Arthur Gill and Peter Smid. Equations found in the book require the user to input tool geometry, cutting parameters, wear factors and more. Utilizing those equations requires a high level of expertise—typically, your tooling supplier will have the experience and the necessary tool geometry to perform the calculations to provide results with reasonable accuracy.
If none of the inputs are known and there is no process data available, the cutting loads can be estimated based on the bearing’s static capacity. Cutting loads typically range from 5% (finishing) to 25% (roughing) of the static bearing capacity; speeds range from 10% (roughing) to 90% (finishing) of the maximum-rated spindle speed. Values can be mixed and matched based on the cutting operation. These are very rough estimates, however, and should only be used for an initial bearing selection.
3: Bearing design and configuration. Commercially, there are many different high-speed/high-precision, angular contact ball bearings on the market, available in many ISO dimensional series. In machine tool spindles, 19 and 10 are the most common.
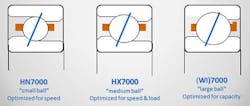
The Timken Company offers three distinct bearing designs for the ISO 10-dimensional series: the small ball HN7000 (HN series), the medium ball HX7000 (HX series) and the large ball 7000 (WI series) shown in Figure 1.
Each bearing design has distinctly different ball sizes, number of balls, and raceway curvatures that determine the capacity, speed limit, and bearing stiffness. Typically, the bearing design is selected according to the intended type of cutting—roughing, finishing or multipurpose cutting (see Figure 2.) This is only a starting point; analysis should be performed to validate the selection.
The bearing design dictates the ball size, number of balls, and curvature, while the bearing configuration is determined by ball material (steel/ceramic), contact angle (15° or 25°), and preload level (extra-light, light, medium, and heavy.) This bearing configuration fine-tunes the capacity, speed limit, and stiffness, and is selected to optimize the performance according to speeds and loads. While the bearing design is selected according to the intended type of cutting, the configuration is based on the duty cycle. The best way to optimize the configuration is to model the spindle analytically.
Timken uses proprietary software to accurately model the bearing/shaft assembly with loads, speeds, and environmental conditions. This modeling provides the contact stress between the balls and raceway, including the preload, external loads, and the centrifugal force of the balls caused by the orbital speed.
Optimization can be achieved by modulating the various configuration parameters to minimize the amount of heat generated in the application. Heat is primarily generated by sliding of the balls along the raceway and skidding due to unloading of the bearing. The preload has the biggest impact on heat generation, and this parameter typically is used to minimize sliding and skidding. Preload is bound by the resultant contact stress between the ball and the raceway. Typically, the maximum limit is less than half the stress required for plastic deformation.
The ball material and contact angle impact heat generation too, but they have a lesser impact than preload. These factors are typically used to fine-tune the configuration based on the type of loading (axial versus radial) and speed requirements. For example: If axial loads are dominant in the duty cycle, then a 25ᵒ contact angle will be selected. And if the speed requirements exceed the rating for a steel ball, then the switch to ceramics should be made.
Having the ability to perform analysis on the under the loads, speeds and environmental conditions takes the guesswork out of selecting the optimum bearing to maximize a spindle’s performance.
4: Proper mounting. With the bearing design and configuration selected, it is important to mount them properly to achieve the desired performance. Shaft and housing seat sizes and geometric form are critical. Preload can change radically if recommended fit-up values fall outside their recommended limits, so it’s important that proper fit-ups are achieved such that the preload is applied correctly.
5: Shaft and housing fits. The shaft fit-ups for spindle bearings are designed to operate at or below speeds of 750,000 dN (dN = bore in mm x speed in rpm) and require a catalog transition fit (slightly loose to slightly tight, nominal line-to-line.) The work-end bearing is fixed axially, and the housing fit is loose. If the non-work end floats axially in the housing, the fit should be extra loose.
Spindle bearings designed to operate above 750,000 dN require an interference fit-up, with the amount of interference depending on the bearing size, speed and shaft bore. This is due to the effects of centrifugal force that cause the inner ring and shaft to grow elastically in the radial direction. If a bearing operating at these speeds is installed using a recommended catalog transition fit, then the fit-up will become loose at the design speed, which risks added runout and having the inner ring spinning on the shaft.
Timken provides a tool for our customers to calculate the speed-dependent fit-up and the corresponding spacer offset for our line of super-precision angular contact ball bearings: The Timken Precision Bearing Selector (TPBS) also provides all the catalog fit-ups, bearing stiffness, and much more. The housing fit-ups do not change based on shaft speed.
6: Micron code. Micron codes are provided on all Timken P4S bearings, indicating how much below the nominal (catalog) bore and OD of a bearing is in microns (µm.) This allows the technician to determine the exact bore and OD to +/-1 µm and perform a final grind of the bearing seat to achieve a targeted fit to within a micron.
Micron codes also are used to match single bearings into sets of two or more. Ideally, operators would want a set with all the same bore and OD micron codes. But, since this is not practical from a manufacturing perspective, a small tolerance is allowed when building sets. Set-matching tolerances are dependent on bore and OD size. The larger the bore or OD, the larger will be the band of micron codes allowed to build the set.
7: Geometric dimensioning and tolerancing. Good design and machining are essential. Tight control of bearing fit-ups is only half the battle: the shaft and housing geometric form also must be held to a tight tolerance. Depending on the size of the bore and OD, that tolerance is between 1 and 8 µm (typically between 2 and 4 µm.) This geometry goes beyond the bearing seat; it holds true for all components that are adjacent to the bearings, such as locknuts, spacers, and end caps.
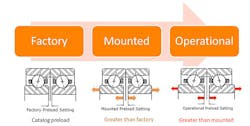
8: Factory-to-operational preload. The catalog preload is ground into the bearing faces at the factory, but it changes when the bearing set is mounted on the shaft with an interference fit-up. When the inner ring is pressed onto the shaft of the raceway diameter increases, causing the mounted stick-out to increase, which adds to the preload setting (see Figure 3.) This is referred to as "telescoping."
Furthermore, when the bearings are in operation and a temperature difference exists between the inner and outer rings, the dimensional setting (or preload) increases further. If a spindle is going to achieve optimal performance when in operation, the mounted preload needs to take into consideration the operational temperatures.
For generally optimized productivity, the bearing design should be selected according to the intended milling operations, while the configuration can be optimized by modeling the under the duty cycle, with the goal of reducing heat due to sliding and skidding. Additionally, bearings must be installed correctly onto the shaft and into the housing, with bearing seats meeting tight geometric dimensional tolerancing and targeted fits using the micron codes.
Following these best practices will help to ensure that spindle bearings are likely to perform as predicted and can help machine tool operators keep their CNC centers operating as intended.
Eric Faust is an application engineering specialist for The Timken Company, and the author of several technical papers on bearing selection. Timken has conducted extensive testing and analysis on its own bearing solutions to help customers make informed choices. The range of options has demonstrated the desired performance for a wide variety of machine tool applications, and specialists are available to assist in bearing selection for OEMs, repair shops or end-users.
