Correction of Thickness and Depth of Roughing Hob for Roughing Straight-Sided Spline Shafts
Our thoughtful contributor sends the following insight:
“Sometimes in the process of milling process we change their thickness for technological reasons. We can do it because the roughing hob tooth profile is trapezoidal and there is no difficulty in correcting it by regrinding the hob tooth thickness and depth on the thread-grinding machine.
“When we change the tooth hob thickness and depth, we change the roughing thickness spline for technological reasons.
“In practice, the roughing splines include grinding allowances that usually vary by the amount A=0.1 – 0.15 mm (0.004-0.006 inch), so there is no influence on other theoretical elements of the spline shafts roughing.
Adjusting thicknesses
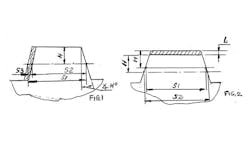
“When the thickness of a roughing spline increases by amount A, the tooth thickness of the roughing hob is reduced by amount S3 on the thread-grinding machine.
"Below we present some formulas for A.S.I.A.
Formula A.S.I.A. – 1
Formula A.S.I.A. - 2
“The tool designer can easily calculate with help from reference books the design of a roughing hob for roughing spline straight-sided shafts.
1. M – angle of trapezia tooth roughing hob.
2. S1, S2 thickness of tooth.
3. D – pitch circle diameter spline shaft (take from the books)
4. B1, B2 – spline roughing thickness.
5. H – addendum of tooth roughing hob.
About the Author
Mark Grizotsky
Owner
Mark Grizotsky, owner of MLG Tool Design in Willowdale, Ontario, has been a major contributor and influencer to machinists everywhere with his insights to machine design and set-up, tooling design and selection, and advice for preparation and processes.


