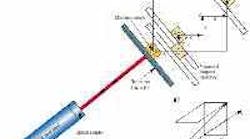
A top-down schematic view of the sequential diagonal technique for volumetric calibration and compensation of a three-axis machine tool shows the diagonal XYZ path trajectory.
Volumetric measurement and compensation of a three-axis machine tool can now be performed in less than two hours, thanks to a new laser calibration system from Optodyne Inc., Compton, Calif. The system is capable of measuring errors for linear position, vertical straightness, and horizontal straightness in all three axes, as well as checking for three squareness errors.
By measuring volumetric errors, the machine tool can be compensated over the whole volume, which improves the accuracy of the machine tool, not just linear displacement. For example, most machine tool calibration checks are for displacement error or linear error parallel to the axis of movement. These checks ignore the vertical straightness error that is perpendicular to the axis of movement and the horizontal straightness error that is perpendicular to the axis of movement and the vertical straightness direction. This results in a vector error, consisting of displacement, vertical straightness, and horizontal straightness errors.
As recommended by the B5.54 standard, volumetric accuracy can be determined with four body diagonal displacement measurements. Since body diagonal displacement errors are sensitive to all the volumetric error components, they provide an efficient test of volumetric accuracy. Optodyne’s Vector method measures all three displacement errors, three vertical straightness errors, and three horizontal straightness errors in four setups. So, instead of taking up to two days to check volumetric compensation, a three-axis machine tool with a one-meter cube volume can be checked in about two hours.
Using Optodyne’s MCV-500 laser calibration equipment and SD-500 Vector measurement system, data can be col-lected for 12 volumetric errors (3 linear, 6 straightness, and 3 squareness) in about 2 hours (1-meter volume).
The SD-500 Vector measurement system, also known as the sequential step diagonal system, can be used to calibrate CMMs and other precision measuring machines as well as CNC machine tools. The SD 500 allows the operator to perform volumetric calibration tests for true volumetric compensation. It also provides a rapid and efficient way of measuring a machine's volumetric accuracy along a diagonal path through the work envelope of the machine.
Easy-to-use software runs on Windows compatible PCs with an RS-232 interface. The software allows the operator to collect and analyze data, generating information on linear and squareness errors and both vertical and horizontal straightness errors. Data can be displayed on the screen of the computer or printed in tabular and graphic format. The software also generates axis-specific files used to generate volumetric compensation tables.
