Strohwig Industries is a family-owned tool-and-die manufacturer – and injection molding operation, and custom machining shop – founded 45 years ago, and now grown to cover 225,000 sq.ft. of working space in Richfield, Wis., with 180 employees. With 56 horizontal and vertical CNC machines and the ability to handle workpieces weighing over 100 tons – including forging dies – Strohwig is ready and able to handle large machining projects.
Brad Bucholtz, quality technician, explained Strohwig’s mission as, “The design, manufacture and repair of medium to large forging dies, plastic injection molds, and metal die casts, as well as the manufacture of custom contract parts and/or components.” They machine various steel alloys (e.g., H-13, stainless grades) forgings and castings, and aluminum components too. Strohwig supplies finishes tooling and dies for manufacturers supplying aerospace and automotive programs; mining and construction equipment; defense and marine programs; oil-and-gas and energy sectors; and so forth. That’s why Strohwig approached Exact Metrology for dimensional inspection technology.
Bucholtz said the operation has been working with Exact Metrology, a division of In-Place Machining Co., for over a decade, initially for metrology services.
Exact Metrology is a comprehensive metrology services provider, offering 3D and CT scanning, reverse engineering, quality inspection, product development, and 2D drawings.
Before 2010, Bucholtz recalled, Strohwig had no need for metrology as it manually inspected any jobs that needed it. Working with Exact Metrology, Strohwig bought a Hexagon Romer Arm in 2016 and Leica Tracker in 2019. When the Romer RS6 scanner was released, Exact Metrology offered a trade-in on the older Romer arm. The productivity increase easily justified the investment of the new arm/scanner.
And that new arm came in handy when Strohwig drew an order from a long-standing customer, a Midwestern forger.
The century-old manufacturer of open-die forgings and rolled rings was using coordinate measuring machines (CMM) but needed to upgrade its equipment. A new job required precise measurability of a large, forged part with complex geometry. Dean Solberg, Exact Metrology co-president suggested to Strohwig that they invest in scanning technology. That led them to purchasing a Leica Tracker and adopting PolyWorks software.
The Leica Absolute Tracker AT960 has an “all-in-one integrated” single-box probing system with “smart” connectivity. Additional features include continuous measurement, entry-level probing with T-probe and two handheld laser scanners: an 8-in. line scan device and a 24-in. line scan unit, to capture huge amounts of data quickly. The system is IP54-certified for protection against dust and other contaminants. PolyWorks | Inspector ™ was used to verify the quality of the part through the use of high-density point clouds and contact-probe datasets.
The scan was performed in a working environment, not a traditional lab, which meant that personnel were doing this while forging occurred.
In the past, Strohwig machined various parts for the forger. Now, it had Strohwig use the Hexagon Romer Arm and the Leica Absolute Tracker to test for compliance versus non-compliance in one of its forged parts.
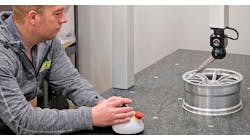
The portable measuring arms allowed the flexibility to measure on the machine shop or the floor. It featured no honing procedures, simplicity of operation, and reliable 3D measurements. The seven-axis Absolute Arm delivers tactile probing and laser scanning in a uniquely ergonomic package. Once this was completed, they used PolyWorks | Inspector™ to verify the quality of the part using a color map.
Now, the forger is looking to purchase additional Exact Metrology products.
Strohwig was able to coordinate with the customers thanks to common communication platforms and daily correspondence with PowerPoint presentations of the results. Brad Bucholtz used data mergers to combine the Romer and Leica data sets into one report.
“We are able to provide detailed reports to our customers,” he explained. “Also, we’re able to perform in-process inspections to validate specific processes.”
He added that Exact Metrology allowed Strohwig to supply a superior product and its deliverable to customers has improved significantly.
When referring to the benefits of working with Exact Metrology, Brad noted, “Training only goes so far. After initial training, there are many stumbles and Exact is always there to make sure we get the knowledge we need. Onsite or offsite, they go above and beyond the call to make sure we can provide our customers with the data they need.”
