Fundamental handtool skills vital for shop performance.
The capability of a vernier or digital caliper depends on the accuracy of the scale. A caliper's design, rigidity of the beam, squareness and parallelism of the jaws to the scale, and general workmanship all impact performance.
Today's high-tech, high-throughput, computerautomated measuring systems have amazing precision and accuracy, but the majority of real-world measurements are performed with simple hand tools. So it goes without saying that shop should begin where all good coaches do, with the fundamentals. In this case, they are the proper handling techniques of steel rules, vernier calipers, and micrometers.
The steel rule is the most common shop tool, but it's also the most over-looked when it comes to training. Many shop managers believe their employees' first-grade instruction on how to use a 12-in. wooden ruler is enough. Sometimes, it's not.
Steel rules are usually made of steel and have a brushed finish to provide contrast between the background and the graduations, which are etched by machines that have traceability to NIST standards. Rules come in a variety of inch or metric graduations, and it's important to know which rule is best suited for a given application. Typically, the rule chosen depends on the blueprints being worked with.
There are two different styles of steel rules, Grade I and II. Grade I rules have their zero points starting a short distance inside from the edge. Grade II rules, the kind most often found in machine shops, have their zero point at the end for easy direct measurement.
For best results, some type of mechanical reference can be used to help align a rule to the part. Even a finger used as a stop is better than nothing. However, there are attachments that improve the accuracy of the measurement. Two such attachments are parallel clamps and squares.
Parallel clamps act like Vs and keep the rule aligned to the axis of a shaft, and they also provide a stable reference when scribing the shaft with a dimensional mark. A square, on the other hand, turns the rule into a slightly different tool, one that provides a straight edge for scribing as well as dimensional measurement.
Vernier calipers
A steel rule, because of space restrictions or other circumstances may be impossible to use for some applications. In these situations, transfer calipers, which evolved into vernier calipers, are effective. And there is a right way to use them.
To measure diameters, for example, set the points of the caliper on the inside or outside diameter. Then measure the distance between the caliper points with a steel rule. While the result is a fairly accurate measurement, there is a strong chance of error.
Workers need to master setting the caliper's points and removing the caliper without opening or closing those points. Also important to accurate use is positioning the calipers on the rule and reading the graduations.
The vernier, and later digital calipers eliminated alignment problems, which were the biggest source of error when using a steel rule. There are many styles and sizes of calipers, but all of them have three components in common:
- The beam, which contains the rule, is graduated and provides a reference standard, support, and rigidity needed for measurement.
- A reference jaw fixed on one end of the beam, which aligns the tool at a right angle to the part for measurement.
- A measuring, or sliding jaw that sets the tool at the opposing side of the dimension being measured. In the case of a vernier caliper, the reference jaw also includes another set of graduations, which read the dimension and increase the resolution of the tool.
It takes practice to read the vernier scale because it involves the relationship between the tool's two scales. Most inch verniers have a fixed scale with 40 1 /40 or 0.025 in. On the sliding scale are 25 graduations, each represents 1 /25 of the main scale subdivision. So, 1 /25 of 0.025 is 0.001 in. Dial calipers eliminated the need for the second sliding scale, reduced reading errors, and improved measurement speed. Later came calipers with digital readouts generated by an electronic scale embedded in the beam and a reading device in the sliding jaw. These provide fast measuring, inch/metric switching, and refer-ence-point setting anywhere along the scale for use as a comparative gage.
Different jaw designs give calipers more versatility. For instance, main jaw sets that are tapered and narrowed at the tips fit better into grooves and other tight places for O.D. measurements.
Secondary jaws, on the opposite side of the beam, are smaller and have measurement contacts facing outward for gaging I.D.s, slots, or widths. They are also tapered for entering extremely small holes and grooves.
Like a steel rule, a vernier or digital caliper is only as good as the accuracy of its scale. In addition, the design and rigidity of the beam, squareness of the jaws to the scale, parallelism of the jaws, and work-manship determine good caliper performance. But it nothing if the caliper is not used properly.
When measuring O.D.s, for instance, it is vital that the beam is perpendicular to the part's centerline and that the caliper is not tilted or twisted. This applies especially to large diameters.
Caliper users should always start the measurement process with the part held against the reference jaw and then bring the measuring jaw to the part. This technique improves consistency between measurements, and workers should practice it until they gain a "feel" and can produce consistent results.
Using calipers to measure inside dimensions also involves a certain procedure. When checking a hole, for example, the jaws need to be rocked as one searches for the largest measurement value. On the other hand, when checking a groove width, users must search for the smallest reading.
Many dial and digital calipers can now measure depths with an extending bar or rod. This boosts versatility. Again, alignment is critical for a good measurement. The tool must be square to the reference surface in all axes.
The micrometer
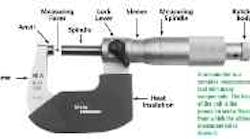
Like the caliper, modern micrometers now incorporate digital electronics, making them fast and accurate. While micrometers are complex, they all center around a precision screw thread from which the measurement is derived.
The lead of the pitch is typically 40 threads per inch, much like the vernier caliper with its 40 graduations per inch. And also like the vernier caliper, the rotating thimble of the micrometer has 25 graduations.
To measure with a micrometer, one must bring the measurement points in firm contact with the anvils by turning the thimble. The precision screw thread is the standard of reference. The actual reading is made by interpreting the relative position of a fixed scale found on the sleeve of the micrometer along with graduations on the barrel.
As with calipers, the user's "feel" plays a part in micrometer use. Operators can apply too much force, deflecting the micrometer. To eliminate such errors, micrometers have a friction, or ratcheting, mechanism to make gaging force consistent. With the ratchet, the micrometer stops closing on the part being measured when the correct amount of contact force is reached.
Typically, micrometers measure O.D.s and thickness, but there are ones specifically for I.D. and depth measurements. The body of an I.D. micrometer is often called the head, and it consists of a sensitive contact and a place to attach extension rods for the other contact. Keep in mind that there comes a point when a hole becomes too deep, or too shallow, to measure with this technique.
I.D. micrometers also require a particular degree of operator skill because the tool has to be aligned in two axes simultaneously — across the diameter axis and in a plane normal to the axis. Practice is the only way to develop this skill, and it takes some time.
To measure a hole larger than 2 in., with an I.D. micrometer, the appropriate measuring head and extensions must be used. The micrometer is then adjusted to the approximate size, and while holding the reference contact with one hand on the part, the size is increased to a touch-sensitive contact. Next, the heads are rotated along the radius while simultaneously rotating in and out along the hole's axis to search for the maximum reading. When no more radial swing is possible, and a slight drag is felt on the axial movement, the measurement is recorded.
Depth micrometers have a flat base and a measuring rod or head mounted perpendicular to the base. The tool must be square to the depth being checked, which is fairly easy since the base generally spans across a flat surface on either side of the depth measurement point.
To develop good overall micrometer techniques, practice by measuring the diameter of a small piece of round bar stock. Hold the part in one hand and the micrometer in the other with the thimble of the micrometer resting between the thumb and forefinger. The third finger holds the frame to the palm of the hand for stability. Turn the thimble until the measurement anvil makes contact with the part and the ratchet drive engages.
Because of their small contact area, micrometers are usually better than calipers when checking sheet thickness because the measurement will not be influenced by bends in the part. While micrometer contacts are typically round and flat, there are other configurations for specialized tasks.
- Disc-style contacts are for measuring thicknesses of part features with limited clearances. This style can also measure the width of gear teeth after some simple calculations.
- Blade-style anvils are for measuring O.D.s at the bottom of narrow grooves. For measuring a screw thread, these contacts will have V-formed anvils and/or special ball contacts.
- Pointed or reduced-surface contacts are for measuring inside recesses where standard contacts may be too thick. A micrometer with one or two conical contacts is best for checking the wall thickness of tubes.
The right tool for the job
Knowing how to use a handtool is only half the battle. A machinist must also know which tool is appropriate for his needs. Gaging versatility is a must in inspection areas where there are a lot of different parts with varying tolerances. Versatility is also important where horizontal or vertical milling machines produce a number of part lengths and hole sizes.
If equipment such as turning centers, cylindrical grinders, or screw machines are producing products within a narrow size range, a micrometer is probably the proper tool. The appropriate range micrometer adjusted to near-desired size allows for fast, precise part-to-part measurements.
For tighter-tolerance parts, digital micrometers are the preferred choice. They have a better resolution than digital calipers, but can be limited in their measurement range.
Take care
Rules, calipers, and micrometers are precision measuring tools and require careful handling to maintain accuracy. They should be cleaned after each use, given a quick once over for any damage or wear, and then put into storage containers. If they are going to be stored for a long time, the contacts may be coated with a light oil and a separator put between the contacts to prevent rusting.
Tool accuracy should be checked periodically. Test the natural wear and warping of vernier-caliper jaws by closing them together and checking the zero-zero point. If the zeros don't align, follow the manufacturer's recommendations for setting them. Also, with the jaws closed, hold the caliper to a light and try to look between the jaws. If there is wear or warping, light will shine through, or an uneven pattern will appear.
On occasion, the zero-zero position of micrometers should be examined, and, if necessary, readjusted according to the manufacturer's instructions. The flatness and parallelism of flat-to-flat contacts used on standard micrometers should also be checked for concave conditions and wear.
Mr. Schuetz is Director Precision Gages for Mahr-Federal Inc., Providence, R.I.
