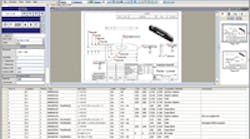
The InspectionXpert First-Article user interface shows sequentially numbered balloons that are automatically added to a print each time a user highlights an element.
Throughout the past lean year, energy markets have remained steady for their suppliers — including oil and natural gas exploration, refining, and distribution. MIC Group is one of those suppliers. The Texas-based shop produces highalloy components, mainly for energy markets, and with concurrent engineering and integrated manufacturing, it develops new products and offers capabilities like investment casting and electron-beam welding, in addition to multiple CNC machining and precision grinding capabilities.
Energy isn’t the only market where MIC is active. Aerospace and defense suppliers also make the call for contract manufacturing of quickturnaround prototypes and full-scale production runs. But, no matter the market conditions, finished product quality is critical to MIC’s reputation and long-term success.
To automate its First Article Inspection (FAI) documentation, MIC Group selected InspectionXpert 2010, developed by Extensible CAD Technologies. It is the latest installment for a quality-control platform used to generate inspection report forms and “ballooned” inspection drawings, quickly and accurately, from CAD programs.
FAI is a necessary task for manufacturers to compare a physical sample with the specifications upon which it was produced (e.g., a CAD version of the component). Each specific dimension is measured on the physical part and compared with the standard, and a list is compiled of the dimensions that have been (or have not been) met.
InspectionXpert inspects components and compares them to versions it draws from CAD programs including SolidWorks, AutoCAD, Solid Edge, Pro/ENGINEER, and CATIA, or from 2D drawings (e.g., PDFs or TIFs among many other formats).
MIC Group’s customers require the inspection data sheets with comprehensive and reliable measured dimensions for every part shipped. Its components average 300 different dimensions to be verified, often with up to 1,800 elements. Among the tasks it performs with InspectionXpert First- Article 2010 are:
1) Applying sequentially numbered balloons to the face of the CAD drawings to track the inspectable dimensions;
2) Creating an inspection sheet, including the reference numbers and actual dimensions that travel with the components to be filled out by the machinists and inspectors throughout the process; and
3) Comparing drawing revisions to evaluate the impact on the manufacturing process.
According to Nathan Byman, MIC Group general manager, “The most powerful advantage of InspectionXpert is that it completes these three tasks simultaneously, and in less time than any one of them could be performed using any other familiar method.”
Recently, MIC Group indicated that since adopting InspectionXpert it is achieving average time savings of 80%. “We currently have one person working full-time doing this job function. Without InspectionXpert, we would need at least four more to keep up with the current workload,” according to Byman.
“When you look at collapsing these functions, you aren’t just looking at an improvement in one area,” he detailed: “You are looking at a total process that, in our experience, is five times faster.”


