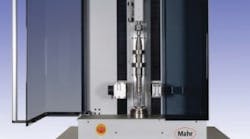
The Mahr Federal Inc. (www.mahr.com) Helio-Scope universal optical measuring system performs static and dynamic precision measurement in seconds without operator intervention. The system is designed to be used in labs and on the shop floor, and allows the measurement of many characteristics on turned parts in seconds and without contact. The company says the HelioScope's automatic measuring sequence eliminates operator influence in measurement results, and its graphic interface simplifies instrument use.
Introduced as a result of the acquisition of Helios Messtechnik by the Mahr Group in early 2006, Mahr says the Helio-Scope is the first of what are expected to be a number of synergies resulting from the merger of the two companies.
The Mahr Helio-Scope can measure parts to 750 mm (29.5 in.) in length and 120 mm (4.7 in.) in diameter, and to 30 Kg (66 lb) in weight. The system incorporates a telecentric precision optical system with a high resolution CCD camera and can resolve lengths and diameters up to 0.0001 mm and angles up to 0.0001 degrees. A wide range of characteristics can be measured, including lengths, intersections, runout, roundness, part axis, pitch, diameters, radius, coaxiality, concentricity, taper length, radius center, and widths of recesses or chamfers. A zoom function allows the measurement of small details such as bevels or small recesses which can be difficult to measure with traditional systems.
Operation of the Mahr HelioScope is via an automatic sequence that is controlled through a graphical interface. Characteristics to be measured are indicated, and nominal values and tolerances entered and saved as a quality control plan. The part is mounted vertically between centers or special fixtures, and once measurement is initiated, a CCD camera located on a measuring carriage scans the part, acquiring millions of points every second. Results are displayed on the screen within seconds and can be stored or printed out. Measurement printout can also be customized to meet customer requirements.


