Determining the Angle of Roughing Teeth of Hobs for Roughing Straight-Sided Splines
One of the more impotent features of the roughing hob for milling roughing straight-sided splines is the angle of the trapezia of the teeth of this hob. We can produce the trapezia easily on the thread-grinding machine, using abrasive trapezia wheel. After milling, the roughing straight-sided spline will appear as a rectangle with two curves on the two sides. This allowance on the splines, after heat treatment, is easy to grind on the spline-grinding machine.
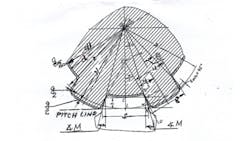
According to Figure 1:
1. MK/CL = tgM = MK/h,
2. MK = S/2-CE = MK = S/2-LM,
3. CE = CBxtg(p/Z) = ((d/2-b/2/sin(p/z))xtg(p/z) =
1/2((d - b/sin(p/z))xtg(p/z) =
1/2((dxtg(p/z)-b/cos(p/z)),
p=3.14158
4. MK = 1/2((S-dxtg(p/z) + b/cos(p/z))
5. tgM = ((S-dxtg(p/z) + b/cos(p/z))/2xh. MLG-A.
6. After calculating angle M of trapezia teeth. We produce a drawing of the spline shaft and teeth (see Fig.1).
7. Then, we need to make a graphic check by running the teeth about the shaft. The roughing spline will look to be rectangular, with curves on two sides of the of the rectangle. Tool-designers will be able to determine how well this is running.
The allowance for curves illustrates the size of the allowance and picture of curves. A tool designer can change the angle of trapezia to provide good distribution of the allowance.
Now, we present the algorithm for calculating the angle of trapezia teeth for roughing hobs:
(for spline shaft) for z = 6.
D1 = 28mm - diameter outside of spline shaft.
d1 = 23mm - inside diameter of spline.
b1= 6mm - spline thickness.
z = 6 - number of splines.
g = 0.4mm - grinding allowance.
a = 0.3mm-size of chamber.
for z* = 8
D1= 48mm, d1 = 42mm, b1 = 8mm, g = 0.4mm, a = 0.3mm.
D = D1-2 x a, 28-2x0.3=27.4,48-2x0.3=47.4,
FOR Z = 6 / FOR Z* = 8
d = d1+g, 23+0.4 = 23.4 / 42+0.4=42.4*,
all sizes in mm.
b = b1+g, 6+0.4= 6.4, / 8+0.4=8.4*,
Pitch circle radius of the spline shaft
R = Sq.Root ((D/2) x (D/2) — 0.75 x (b/2) x (b/2))
R =13.4167, / R* =23.4192,
spline angle sin@ = b/2xR
sin@= 6.4/2x13.4167, / sin@*=8.4/2x23.4192
sin@=0.2385087 / sin@*=0.1793400
@ = 13.798539 degree/ @* = 10.331320 degree,
Hob thickness tooth on the pitch
S = 2xRx(p/z-0.0174533x@),
S = 2x13.4167x(3.141592/6-0.0174533x13.798539) =
7.5876. /
S* = 2x23.4192x(3.141592/8-0.0174533x10.331320) =
= 9.947697.
h = R - d/2
h = 13.4167 -23.4/2 = 1.7167 /
h* = 23.4192 - 42.4/2 = 2.2192.
tgM = ((S-dxtg(p/z)+ b/cos(p/z))/2xh, MLG - A .
=========
tgM = ((7.5876-23.4xtg(3.141592/6) +
+6.4/cos (3.141592/6))/2x1.7167 =
0.427474, angle M = 23.145471 degr.
=========
for z = 6,
=========
tgM* = ((9.947697-42.4xtg(3.141592/8) +
+8.4/cos(3.141592/8))/2x2.2192 =
= 0.332788, angle M*=18.406866 degr.,
=========
for z*= 8.
=========
tg ((3.141592/6) x 57.3degr.) = tg(30degr) = 0.5777350,
cos((3.141592/6) x 57.3degr. = cos(30degr) = 0.866025.
About the Author
Mark Grizotsky
Owner
Mark Grizotsky, owner of MLG Tool Design in Willowdale, Ontario, has been a major contributor and influencer to machinists everywhere with his insights to machine design and set-up, tooling design and selection, and advice for preparation and processes.
