In the design-sensitive, high-value market of building corporate jets, everything gets the high-tech treatment — even the “necessaries.” Aircraft Technologies Inc. manufactures toilets for the specialty aviation sector. When it developed a new design for its main product the San Antonio manufacturer assigned the tooling engineering to NVision Inc., and saved $20,000 and four weeks of new-model development time.
NVision Inc. performs non-contact optical measurement for reverse engineering and inspection. It offers contract scanning services and systems for OEMS and suppliers in the aerospace, power generation, and oil/gas industries.
Laser scanning works by projecting a line of laser light onto the surface to be measured while a camera continuously triangulates the changing distance and profile of the laser line as it sweeps along. A computer translates the video image of the line into accurate 3D coordinates of the object’s geometry. Then, NVision engineers create point clouds consisting of millions of data elements and use that scan information to create solid models, and to output IGES/STEP CAD surface models.
Aircraft Technologies Inc. is a single-source supplier of sanitary systems for airframe manufacturers, as well as completion centers and maintenance and repair facilities. Its Series 90 externally serviced toilets are made of thermoformed Kydex (thermoplastic acrylic-PVC) and composites to achieve a high strength-to-weight ratio. Closing the lid initiates an automatic flush. The new Series 90 design will be produced in volumes of about 70 per year for one corporate aircraft manufacturer.
“By scanning an existing upper and lower bowl assembly and modifying the resulting CAD models to fit parts that we already had tooling for, we substantially reduced the tooling cost and got the product to market faster,” according to owner Mark Riebesehl, who also is the company’s vice president of operations.
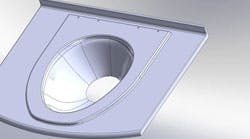
The main parts in the new design are the bowl cap, spray ring, and upper and lower bowl assembly. The normal approach to tooling up for a new toilet would have required designing all four parts from scratch and then building a new thermoforming tool for each part. However, Riebesehl noted that an existing bowl cap and spray ring from one toilet and an existing upper and lower bowl from another toilet closely matched the new design, and so the existing tooling would work well if modifications could be made to the upper and lower bowl so that they could fit together.
“The upper and lower bowl were designed before we started using CAD, so there was no model that we could modify,” Riebesehl explained. “I had heard about NVision’s laser scanning and decided to try reverse-engineering the existing upper and lower bowl tooling. We hired NVision’s Engineering Service Division to scan the two parts and provide us with the CAD models.
Noting that the upper and lower bowl tooling was nearly irreplaceable, Riebesehl and a partner took them to the NVision workshop and watched as technicians they scanned the parts. It was a quick project, and the manufacturers returned from Dallas to San Antonio with the scan data in the same day. “NVision then sent us the CAD surface models via FTP,” he concluded.
Riebesehl estimated a cost savings of $20,000 based on the savings of producing two new tools, rather than four, thanks to NVision’s scanning services. The process also helped to get the new product into production four weeks earlier than the alternative approach.
“When we got back we modified the CAD models to mate up with the existing bowl cap and spray ring,” he said. “Then we generated CNC programs and built the tooling on a machining center. Everything fit together perfectly, validating the accuracy of the laser scanning process.”
